Bitcoin still in ‘up only mode,’ but these are the key price levels to watch
In a strong trend, you don’t need to predict – you need a plan. This guide shows you the critical Bitcoin price levels, the indicators that matter, and how to trade a market that wants to go higher while staying protected if it doesn’t.
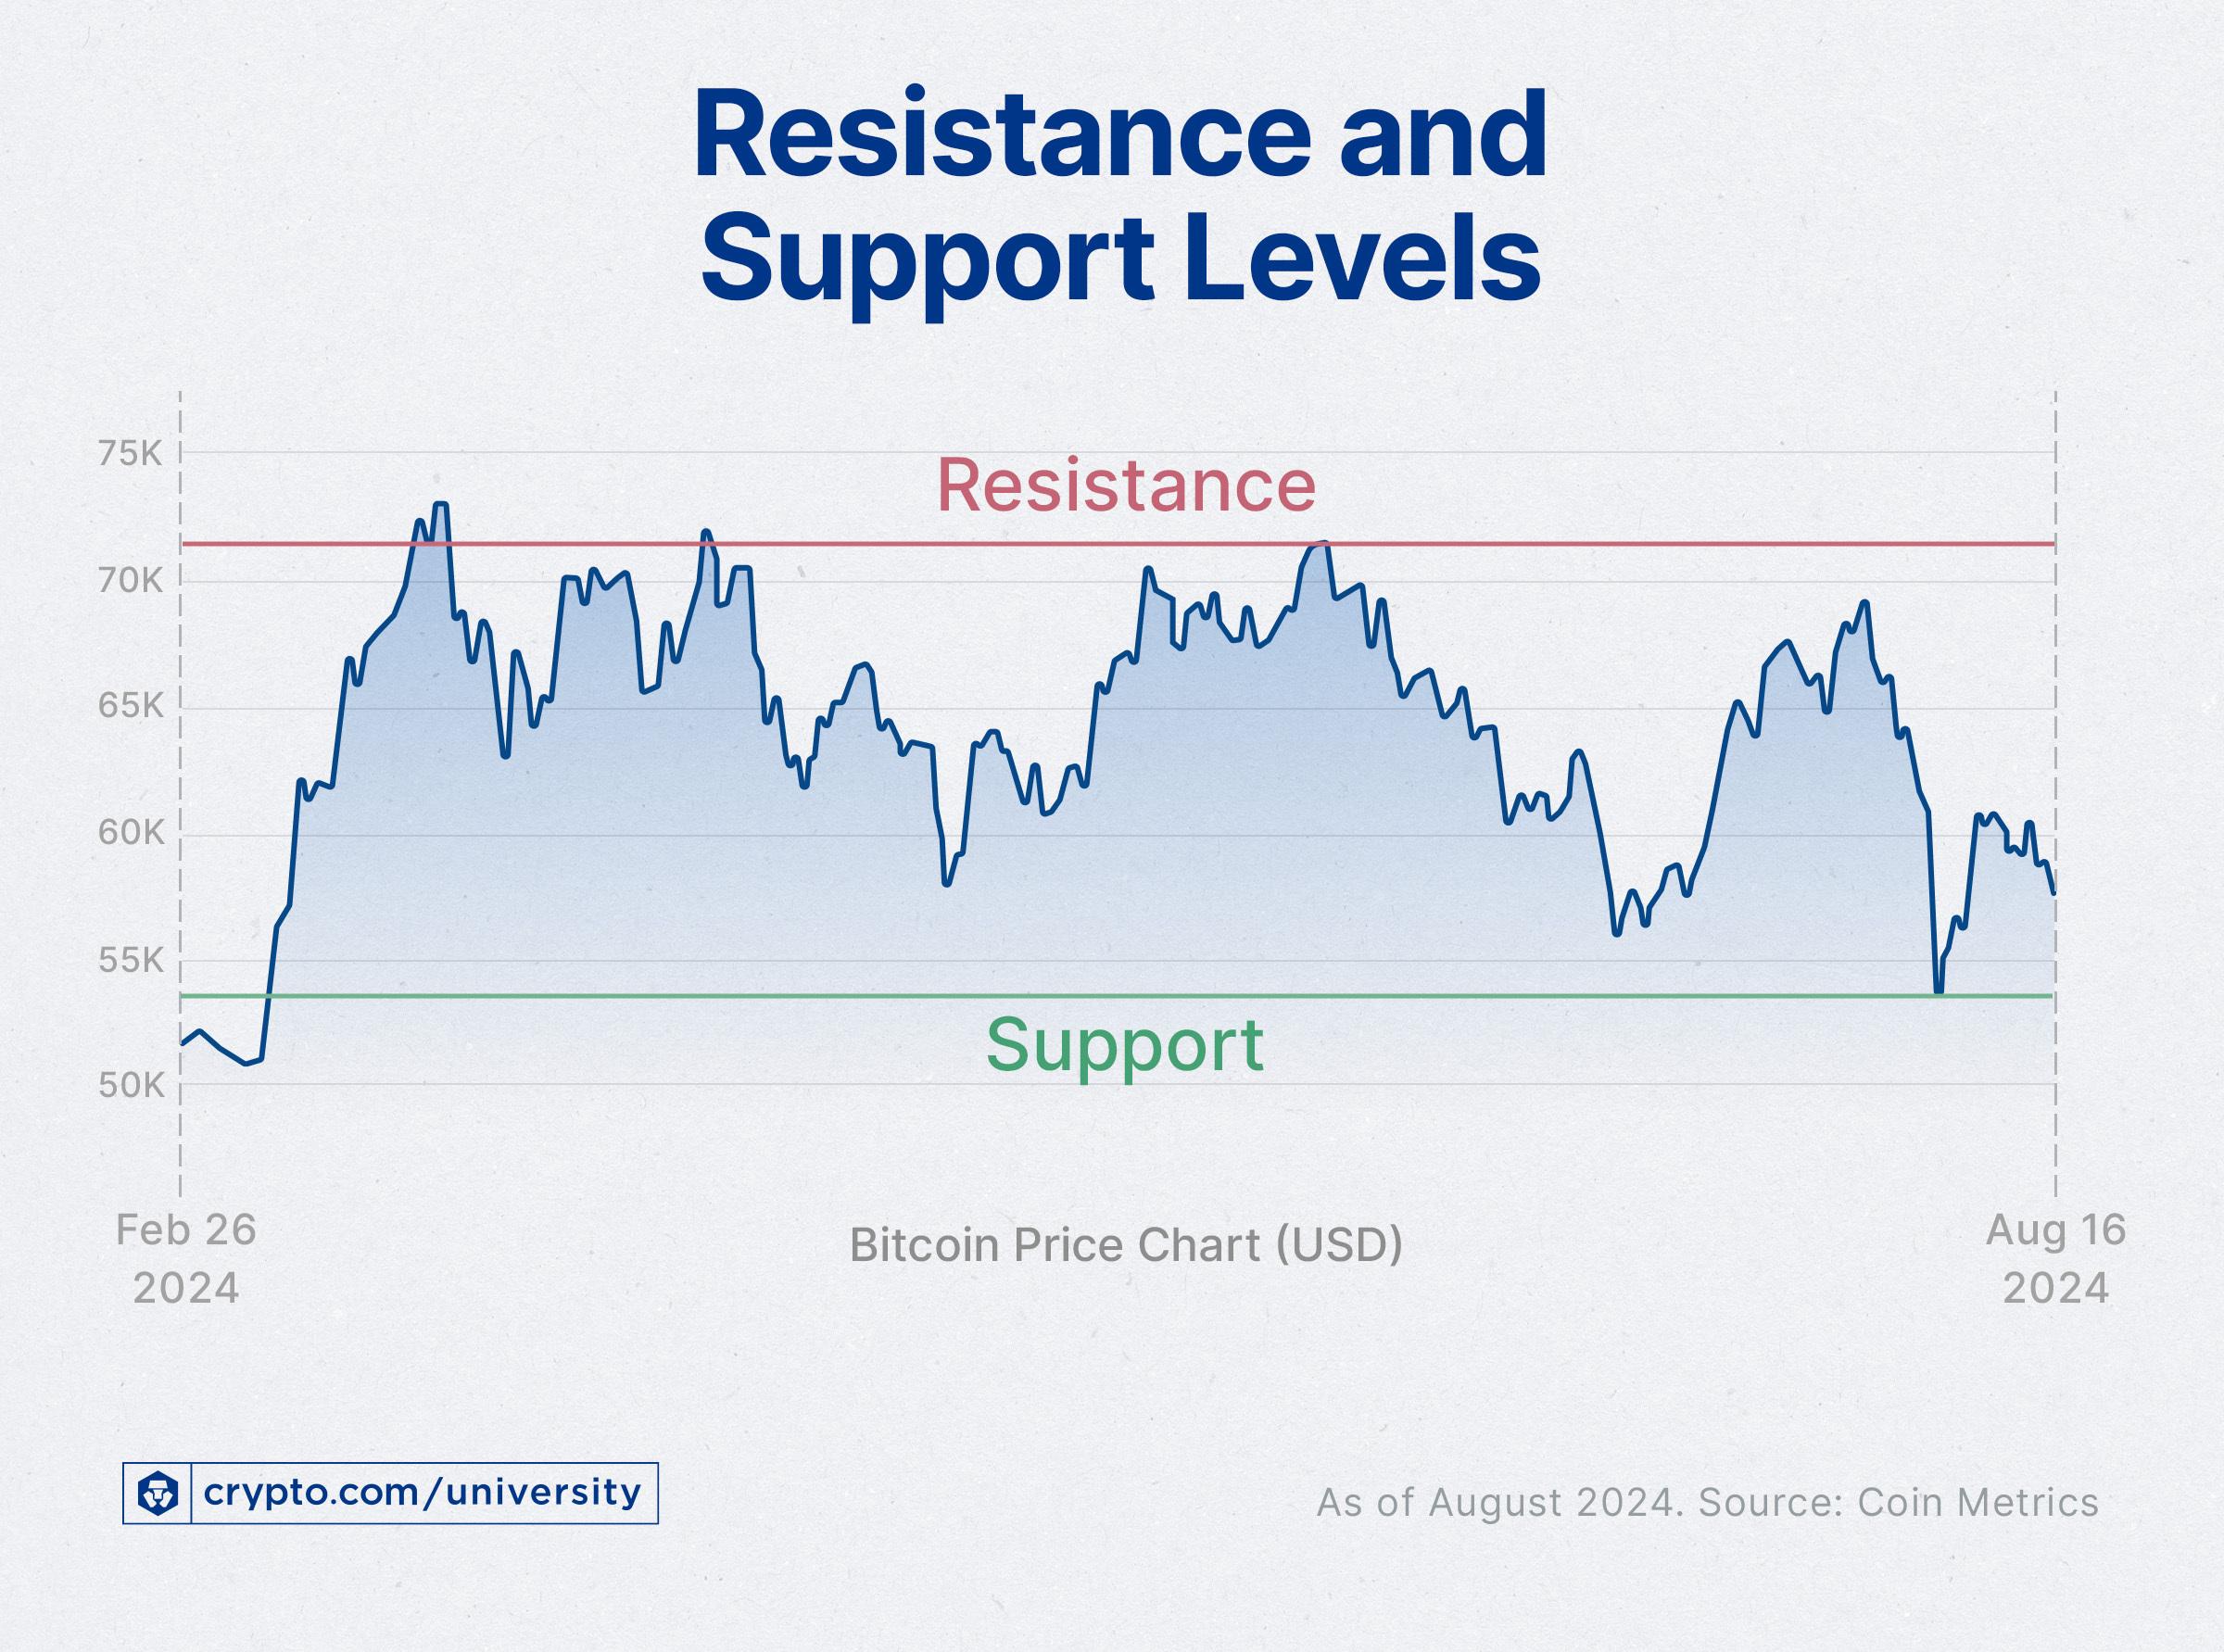
Why Bitcoin appears to be in “up only mode”
“Up only” is a tongue-in-cheek phrase traders use when the higher time frame trend is clearly bullish. For Bitcoin (BTC), the trend is driven by a mix of technical structure and fundamental flows. Here’s what typically defines this environment:
Technical structure
- Higher highs and higher lows on the weekly chart: This confirms trend continuation until proven otherwise.
- Key moving averages aligned bullish: 20-week EMA above the 50-week SMA; on the daily, 50-day SMA above the 200-day SMA (a “golden cross”).
- Shallow pullbacks: Dips hold at prior resistance-turned-support levels, and breakouts are followed by consolidations, not full reversals.
Fundamental and macro drivers
- Spot ETF participation: Sustained net inflows mechanically absorb supply, especially when exchange reserves are low.
- Post-halving supply dynamics: Issuance cuts reduce miner sell pressure over time, tightening supply.
- Liquidity cycles: Softer dollar (DXY), stable or easing rates, and improved risk appetite support crypto risk assets.
In this context, “up only” doesn’t mean straight up. It means the path of least resistance remains higher while pullbacks are opportunities as long as key supports hold.
The key Bitcoin price levels to watch
Below is a curated set of high-probability support and resistance zones traders commonly track. These are approximate anchors based on widely referenced levels from recent cycles and should be adapted to your live chart. Always confirm with your exchange’s spot chart and your chosen timeframe.
| Level (approx.) | Type | Why it matters | What to watch |
|---|---|---|---|
| $73.5k-$74k | Major resistance / ATH zone | 2024 all-time high supply pocket; heavy interest and options strikes cluster near round figures | Clean weekly close above → trend acceleration; failed breakout → range |
| $69k-$70k | Key pivot / prior ATH | Infamous 2021 high; S/R flips here often define bull continuation | Retest and hold → bullish; lose it on weekly close → momentum fades |
| $64k-$65k | High-volume node | Volume profile support; institutional re-entry zone in pullbacks | Wicks okay; sustained closes below raise risk of deeper retrace |
| $60k | Psychological support | Round-number magnet; common area for liquidity hunts and bounce attempts | Sharp liquidations possible; look for reclaim with rising volume |
| $58k | Structural support | Prior range high from earlier cycles; often aligns with 0.236-0.382 fibs in strong trends | Loss on weekly close → opens path to $52k-$54k |
| $52k-$54k | Deeper pullback zone | Legacy pivot and demand area; common landing for 0.382-0.5 retracements | High-conviction DCA and confluence checks (MA, VWAP, volume) |
| $80k | Psychological resistance | Round figure where profit-taking and option gamma effects amplify | Momentum + volume confirmation needed to break and hold |
| $85k-$90k | Extension zone | 1.272-1.414 Fibonacci extensions from prior ATHs | Watch for divergences; great for trailing stops and scale-outs |
| $100k | Macro target | Round-number “magnet” if trend persists and flows remain supportive | Expect volatility spikes and media-driven momentum |
Pro tip: The best levels often have confluence – a prior high/low, a moving average, a volume node, and a Fib level clustered together. The more reasons a level exists, the higher its signal quality.
How to map levels on your own chart
Here’s a simple, repeatable process to define Bitcoin support and resistance like a pro:
- Set your primary timeframe: Weekly for macro trend, daily for swing trading, 4h for entries.
- Mark structure: Draw the last two higher highs and higher lows on the weekly. These anchor your trend map.
- Add moving averages: 20-week EMA, 50-week SMA; on daily, 50D and 200D SMA. Trend is intact while price holds above these on closing basis.
- Plot Fibonacci retracements: From the most recent major swing low to swing high. Monitor 0.236, 0.382, 0.5, and 0.618 levels for potential pullbacks.
- Anchor VWAP from the cycle low or a major breakout (e.g., prior ATH reclaim). Price interaction with anchored VWAP often marks institutional interest zones.
- Check volume profile (VPVR): High-volume nodes (HVNs) act as magnets; low-volume nodes (LVNs) are fast-move areas.
- Overlay liquidity cues: Round numbers ($60k, $80k, $100k), prior day/week highs and lows, and notable gap fills on CME futures.
Now compare your findings with the table above. Where multiple tools agree, you’ve found a high-quality level.
Indicator cheat sheet: technical, on-chain, and derivatives
Levels tell you where; indicators suggest when. Use these as confirmation, not prediction.
Technical momentum
- RSI (14): In strong uptrends, 55-65 often acts as support. Overbought readings (>70) can persist during breakouts.
- MACD (daily/weekly): Crosses above the signal line with rising histogram favor continuation; weakening histogram into resistance warns of stall.
- Market structure: Breakouts should see expanding volume. A breakout on declining volume is vulnerable to a fakeout.
On-chain flows
- Exchange reserves: Declining BTC on exchanges suggests less immediate sell supply.
- Miner behavior: Elevated miner outflows can precede pullbacks; stable or declining outflows support trends.
- Whale accumulation: Growth in large holdings (>1k BTC) during dips signals confident bid.
Derivatives and ETF signals
- Funding rates: Persistently high funding indicates crowded longs; rising price plus neutral/slightly positive funding is healthier.
- Open interest (OI): Climbing OI with rising price supports trend; if OI spikes without spot volume, watch for squeezes.
- Liquidation heatmaps: Clustered short liquidations above resistance can fuel breakouts; long clusters below support can deepen dips.
- Spot ETF net flows: Consistent net inflows add steady demand; outflows into weakness can pressure price.
| Signal | Bullish read | Risky read |
|---|---|---|
| RSI (daily) | 55-65 holds on dips | Divergence near resistance |
| Funding (8h) | 0.00%-0.03% | >0.10% and rising |
| Open Interest | Up with spot volume | Up without spot volume |
| ETF net flows | Multi-day inflows | Persistent outflows |
| Exchange reserves | Trending lower | Sharp spikes up |
30-90 day scenarios and trading playbook
The market doesn’t owe us certainty, but it does offer scenarios. Define invalidation for each path.
1) Bullish continuation
- Trigger: Weekly close above the $73.5k-$74k ATH zone on strong volume.
- Path: Break → brief consolidation or retest → expansion toward $80k, then $85k-$90k extensions.
- Plan:
- Breakout entry: Scale in on retest of the breakout with tight invalidation just below.
- Trend-follow: Trail stops using 20D EMA or prior daily low; scale out into $80k/$85k.
2) Constructive range
- Trigger: Rejections at ATH, but higher lows hold above $64k-$65k.
- Path: Range builds between $65k and $74k while indicators reset.
- Plan:
- Range trade: Buy support confluence ($65k-$69k), sell resistance ($73k-$74k), keep stops outside the range.
- Patience pays: A coiled range often precedes the next directional leg.
3) Deeper pullback, trend intact
- Trigger: Loss of $60k-$58k on a weekly close.
- Path: Fast move to $52k-$54k (0.382-0.5 fib confluence, HVN), then a higher time frame decision.
- Plan:
- Conditional bids: Ladder in at high-confluence zones, leave room for wicks.
- Invalidation: If 200D SMA breaks and fails to reclaim, reduce risk and reassess the macro trend.
Invalidation principle: If price closes below your defined structure support on the timeframe you trade, the thesis is wrong. Exit or reduce and wait for the next setup.
Risk management, benefits, and practical tips
Benefits of trading with levels
- Clarity: Knowing your levels reduces impulsive decisions.
- Repeatability: A consistent process beats guesswork.
- Risk control: Levels provide logical invalidation points for stop placement.
Practical tips
- Size small, think long: In bullish regimes, trends last longer than you expect; use smaller size and wider stops at high-confluence support.
- Don’t chase blow-offs: If funding spikes and price stretches far above the 20D EMA, wait for a pullback or a fresh base.
- Use alerts: Set alerts around $69k, $64k-$65k, $60k, and $74k to avoid screen fatigue.
- DCA for investors: If you’re an investor, dollar-cost averaging near the 20-week EMA historically improves entries during bull markets.
- Mind the macro: Watch DXY, US yields, and CPI/Fed communications; risk assets move with liquidity.
Note: This article is educational and not financial advice. Always do your own research and manage risk.
Mini case study: From breakout to trend follow
Context: In a prior cycle, Bitcoin reclaimed a former all-time high, consolidated just below it, then broke out on increasing volume. Traders who combined levels with momentum had a straightforward plan:
- Preparation: Mark prior ATH as resistance; identify support at the most recent higher low and at the 20D EMA.
- Trigger: Wait for a daily breakout with expanded volume. Enter partial size or set a stop-limit buy slightly above the consolidation.
- Retest: If price retested the breakout zone, add on confirmation (bullish wick, volume spike) with stop just below the reclaimed level.
- Management: Trail stop under higher lows or the 20D EMA; scale out at round numbers and Fibonacci extensions.
- Outcome: Even with volatility, the structure provided clear invalidation and multiple opportunities to add on strength.
The takeaway: Structure + confirmation + discipline beats trying to nail the exact top or bottom.
Quick FAQ
Is “up only” real?
No market goes straight up. “Up only” is shorthand for a bullish higher time frame trend. Pullbacks still happen and can be sharp; your edge is having predefined levels and invalidations.
Can Bitcoin reach $100k in this cycle?
It’s a plausible magnet if the trend persists, ETF inflows remain net positive, and macro conditions don’t tighten significantly. Your job isn’t to predict the number – it’s to respond to price at each level.
What if we lose $58k-$60k?
That increases odds of a deeper retracement toward $52k-$54k. Reassess the trend on weekly closes, monitor the 200D SMA, and reduce risk if momentum flips.
Conclusion
Bitcoin can feel like it’s in “up only mode,” but sustained success in a bull market comes from process, not predictions. Focus on the key levels – $69k as a pivotal S/R, $73.5k-$74k as the breakout gate, $64k-$65k and $60k-$58k as critical supports – and let confluence across moving averages, Fibs, volume profile, and flows guide your decisions.
If the breakout arrives, have a plan to add on strength and trail risk into $80k and $85k-$90k. If the market pulls back, know your buy zones and invalidations. Either way, you’re not guessing – you’re executing.